
Experts in Restaurant Equipment Repair
Restaurant Commerical Equipment Repair Services
Prevent Inventory Loss and Downtime for your Restaurant or Food Service Business. Call Now For Restaurant Refrigeration and Appliance Repair Services!
Why Choose Us For Manhattan, NY
Restaurant Refrigeration Equipment Repair Services?
The Importance of Timely Restaurant Equipment Repair:
Ensuring Efficient Operations and Customer Satisfaction
Running a successful restaurant requires more than just delicious food and excellent service. Timely maintenance and repair of restaurant equipment is crucial for ensuring efficient operations and customer satisfaction. From ovens to refrigerators, every piece of equipment plays a vital role in the smooth functioning of a kitchen. We will explore the importance of timely restaurant equipment repair and how it can impact your business's bottom line. Whether it's preventing costly breakdowns or maintaining high standards of cleanliness and safety, staying on top of equipment maintenance is key to running a successful restaurant.
Preventing Costly Breakdowns: The Financial Impact of Timely Equipment Repair.
- Avoiding Downtime: Timely equipment repair helps prevent costly breakdowns that can disrupt operations, leading to downtime. When a key piece of restaurant equipment fails, it can halt production and service, resulting in lost revenue and dissatisfied customers.
- Reduced Repair Costs: Addressing equipment issues promptly can significantly reduce repair costs in the long run. Ignoring minor problems can escalate into major breakdowns that may require extensive repairs or even replacement, putting a strain on your budget.
- Ensuring Operational Efficiency: Keeping your restaurant equipment well-maintained through timely repairs ensures operational efficiency. By fixing issues before they worsen, you can maintain smooth operations, meet customer demands effectively, and ultimately boost profitability.
The Importance of Timely Restaurant Equipment Repair
Running a successful restaurant extends beyond excellent food and service. Timely equipment maintenance plays a critical role in operational efficiency and customer satisfaction. Every kitchen component, from ovens to refrigerators, contributes to smooth operations.
Preventing Costly Breakdowns
Prompt equipment repair prevents disruptive breakdowns that halt production and disappoint customers. Addressing minor issues early significantly reduces long-term repair costs and helps maintain operational efficiency. Ignoring small problems often leads to major failures requiring expensive repairs or complete replacement.
Ensuring Safety and Hygiene Standards
Properly functioning equipment maintains high safety and hygiene standards, preventing health risks like contamination or foodborne illness. Timely repairs ensure compliance with health regulations, avoiding potential fines or closure. Well-maintained equipment also builds customer confidence in your establishment's cleanliness and quality.

Maximizing Operational Efficiency
When equipment issues are addressed quickly, restaurants avoid costly disruptions and maintain smooth operations. Functioning equipment allows staff to provide prompt service and deliver high-quality food, creating positive dining experiences that increase customer retention and profitability.
Financial Implications of Neglect
Postponing maintenance often transforms minor issues into major problems requiring expensive solutions. Equipment downtime affects both operational efficiency and customer satisfaction, ultimately impacting your bottom line.
Partnering with Reliable Service Providers
Selecting dependable repair partners ensures prompt attention to equipment issues. Research potential providers thoroughly, establish clear communication channels, and consider regular maintenance agreements to prevent major breakdowns. Prevention consistently outperforms crisis management when maintaining efficient kitchen operations.
Final, timely equipment repair is essential for restaurant success. Addressing issues promptly helps avoid costly breakdowns, minimize downtime, and protect your reputation with customers.
Contact Cooler U Manhattan for Service Today!
917-243-9092
Frequently Asked Questions
Struggling to find what you need? Don't worry! We're Just A Call Away! 917-243-9092
What causes a walk in cooler to freeze up?
Your cooling unit has an evaporator coil that helps manage the temperature inside of the walk-in cooler. Evaporators are installed with a thawing system which is designed to help the melting off any frost or ice that develops on the coils, and then the water from the melted frost or ice is drained out of the unit. If the water doesn’t appear to be draining and the ice is not being melted off the coils, it can cause the heat transfer surface areas to increase in temperature and put the equipment of the walk-in cooler at risk of failure. Correct care requires to be taken whenever placing items inside of the cooler. If the cooler is overcrowded with things, or things remain in front of the evaporator fans, the flow of air will be decreased in addition to the performance of the refrigeration system.
How frequently should a walkin freezer defrost?
A defrost heater ranking of a common medium sized commercial freezer evaporator coil producing 46,000 BTU/h of cooling is 10,950 watts. As discussed above, a typical defrost cycle lasts about 30 minutes and takes place 4 times a day leading to 2 hours of run time.
My Freezer is Cold, but Not Freezing Cold?
Top Reasons that your freezer isn’t freezing your food Condenser Coils are Dirty If the condenser coils lie within the freezer walls, the coils do not require cleansing. Nevertheless, if the condenser coils can be readily accessed from behind or under the unit, you ought to clean them every 6-12 months. If the condenser coils are unclean, they won’t be able to dissipate heat successfully, considerably decreasing the cooling capability of the freezer. If the condenser coils are unclean or have actually not been cleaned in a while, clean them. Compressor The evaporator fan motor pulls air over the evaporator coils and flows it throughout the freezer. If the evaporator fan motor is not working, the freezer will not cool. On many fridges, the fan motor will not run when the door is open. Start Relay The start relay supplies power to the compressor. If the start relay isn’t working correctly, the compressor may run intermittently or may not perform at all. If the compressor won’t run, the freezer will not cool.
What Is The Right Temperature For A Walkin Cooler?
A walk in cooler moves heat from the box to the space around the condenser. Common temperature ranges are from 35 degrees Fahrenheit to 41 degrees. Below 35 degrees a forced defrost cycle is required to avoid freeze ups.
What is the correct temperature for a walkin freezer?
Some foods are more sensitive to cold temperatures than others, so the type of food you are storing in addition to the type of refrigeration unit you are utilizing will likewise impact the temperature you should set. For example, foods that require being kept below 35 F will require a forced defrost cycle. Here are some basic standards for temperature ranges based on the type of refrigeration unit you have: Reach-In Freezers +5 F to -10 F. Walk-In Freezers 0 F to -10 F. Ice Cream Freezers -10 F to -20.e accept returns within a specified period after delivery, provided the item is in its original condition.
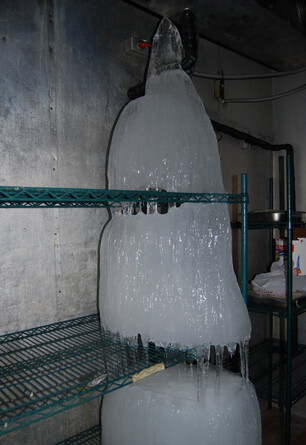
Ice in the Freezer? How to quickly remove it...
There are several ways to by hand thaw a fridge. Depending upon the thickness of the ice layer you are dealing with, you may need to integrate several techniques. Leave the door open and wait, looking in occasionally to clean up water as it gathers. This is the most safe technique, however it takes the longest time – anywhere from several hours to more than a day, depending upon climate and ice thickness. Fill a bowl with boiling water, put it in the freezer compartment and close the door. After 30 minutes, eliminate the bowl and clean up gathered water. Repeat as required up until all the ice is melted. Put a cloth into a heatproof bowl and moisten with boiling water. Pour over a little amount of rubbing alcohol, then lay the hot towel on an area of ice to loosen it up. After a couple of minutes, make use of a plastic scraper or spatula to eliminate any ice pieces. Arrange a box fan to blow into the interior of the freezer. The increased air flow will speed the ice melt, so examine the progress every 45 minutes and clean up gathered water. If you are defrosting a tiny refrigerator, this technique will likely get the entire job carried out in about 35 minutes. Set up a wet/dry vacuum for damp use. Alternate in between the blowing setting to help melt the ice and the vacuum setting to suck up the gathered water.
